I got a new phone today! In other news, because I finished all my imminently due homework and haven’t slacked much the whole weekend, here’s a tutorial (?) on how to extract lineart onto a layer of its own in Photoshop. Version used here is CS3 – but it works with even 5 or 6, I think.
You will need: Photoshop/GIMP/image editor of your choice, and a scanned image with lineart in either pencil or pen. Pen gives you much nicer results though.
Time: Under 2 minutes.
Step 1

Open your image. As you can see there’s some, um, debris on the right side so I’m going to delete it.
Step 2
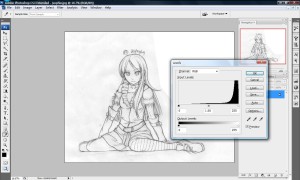
Press Ctrl/Cmd + L to open up the Levels dialog as shown above. Play around with the sliders until most of the gray junk is cleaned off the image, like in the next step.
I find it most effective to drag the right slider towards the left, and the leftmost slider to the right. The middle slider adjusts the overall brightness of your image.
Step 3
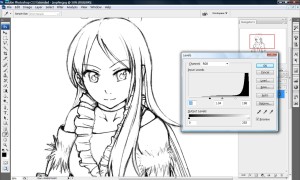
You may also find it helpful to zoom in while you’re adjusting (keyboard shortcuts Ctrl/Cmd + + and – still work even though you’re in the dialog) to make sure finer details are not lost.
Step 4
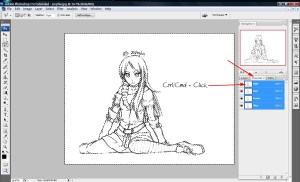
After this is done, open up your Channels tab (if it’s not visible, go hunting in the Window menu). While holding down Ctrl/Cmd click on the RGB Channel, which produces a selection delineated by the marching ants.
Step 5
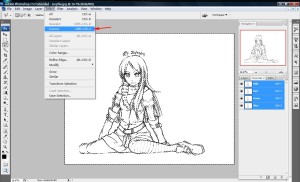
Press Ctrl/Cmd + I or use “Inverse” in the Select menu. In the screenshot above I haven’t actually done this, so the marching ants still look the same as in the previous step.
Step 6
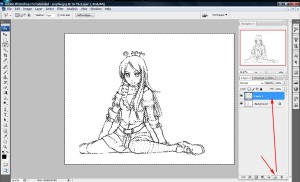
After that’s done, create a new layer but don’t deselect!
Step 7
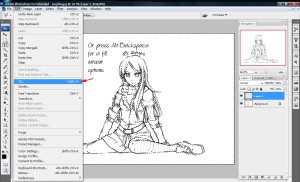
Press Alt+Backspace or use the Fill command in the Edit menu. Make sure your foreground color is set to the color you’d like your lines to be – I was too lazy to find a nice shade of brown, so I used black.
Step 8
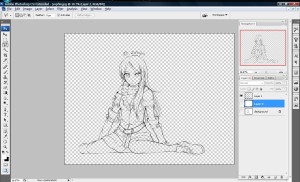
If you hide the Background layer you should now see your lineart presented on its own in a separate layer.
Final Result
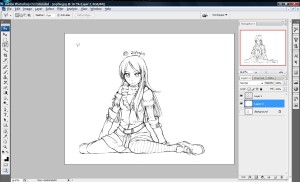
And you’re done! Sort of. My image still has a lot of junk here and there that is very obvious if you zoom in, so next I’m going to have to zoom in and do cleanup with the Eraser tool. You can stop here if you’d like – I’m just feeling a bit industrious right now.
A word about the type of art you begin with – pen is the smart choice, because as you can see in the photograph below the lines are already very clear on paper so when you scan it in it should be easier. Another plus point is that ink is less reflective than graphite, giving you lines with more contrast in the scanned image.


To bad this is completely useless on a MAC, those keyboard short cuts just don’t work the same on a Mac and you don’t always tell us how to do it manually.
Alex, I believe you’ll find this works perfectly well on a Mac. Could you clarify what you mean by ‘how to do it manually’?
I use Macs in my work as well, and Photoshop shortcuts are pretty much universal across Mac and Windows.
this is cool!but i can draw bbetter
That’s lovely. I have a lot to learn as well. Will you teach me?
Pingback: Sophie Casterwill « SIGMA+ » a creative effort
agreed. gd point with the pencils. they don’t work well with scanners…
It depends on the kind of look you’re going for, I think. That in turn will affect the kind of lines you want your drawing to have.
This is very helpful! Thank you bunches, for making this.
❤ -M
I LOVE THIS